
Replacing On-Premise GTM & LTM with Cloudflare
This is an overview guide is to help provide a technical review of the migration from traditional on-premise Global Traffic Manager (GTM) and Local Traffic Manager (LTM) appliances to a modern, unified Cloudflare-based architecture. This document explores three common scenarios, leveraging Cloudflare's global network to enhance security, performance, and reliability.
Traditional GTMs handle DNS-based global server load balancing (GSLB) to direct users to the appropriate data center, while LTMs manage traffic distribution to servers within a single data center. Cloudflare consolidates these functions into a single control plane, offering a powerful and flexible alternative.
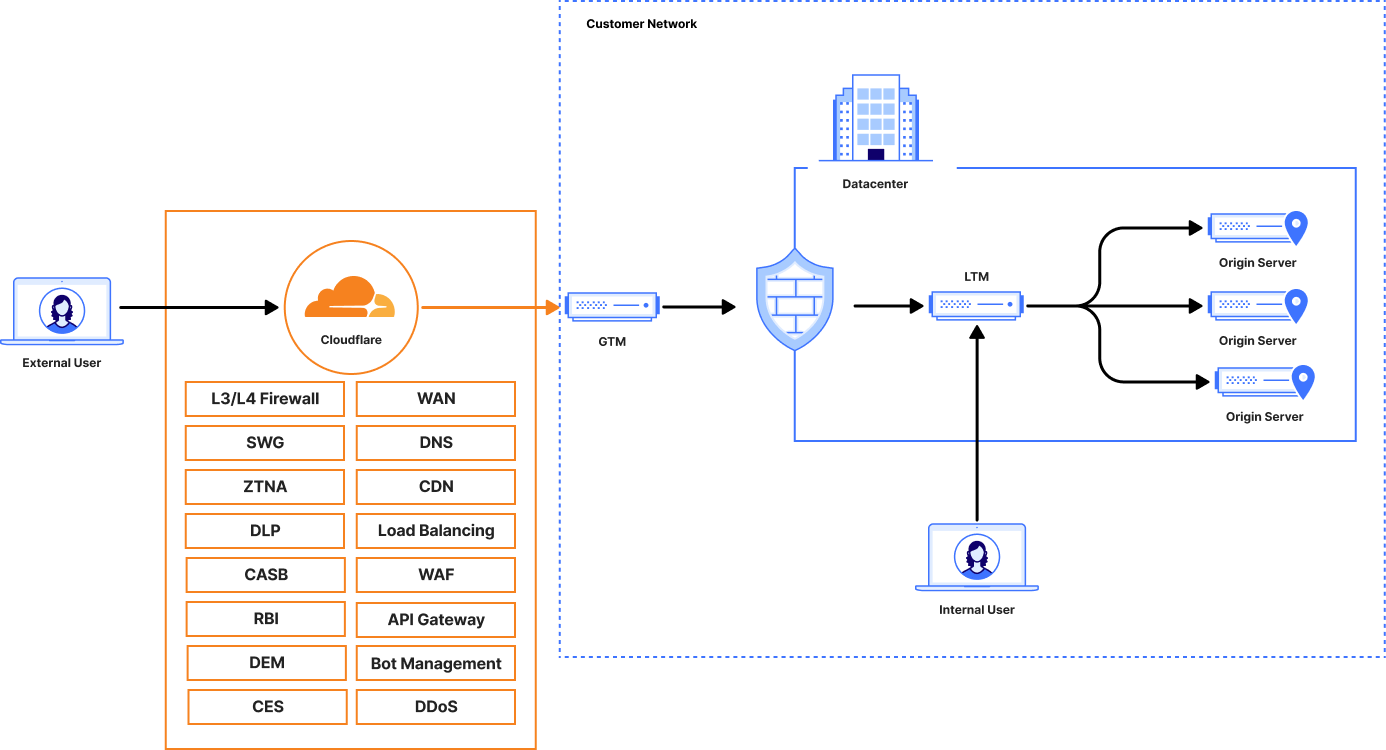
Some customer currently employ GTM and LTM in slightly different configurations where the GTM is being utilized as the entry point for traffic, then directing requests to the LTM for distribution to the correct server pools.
The below illustration provides a high level overview of that model:
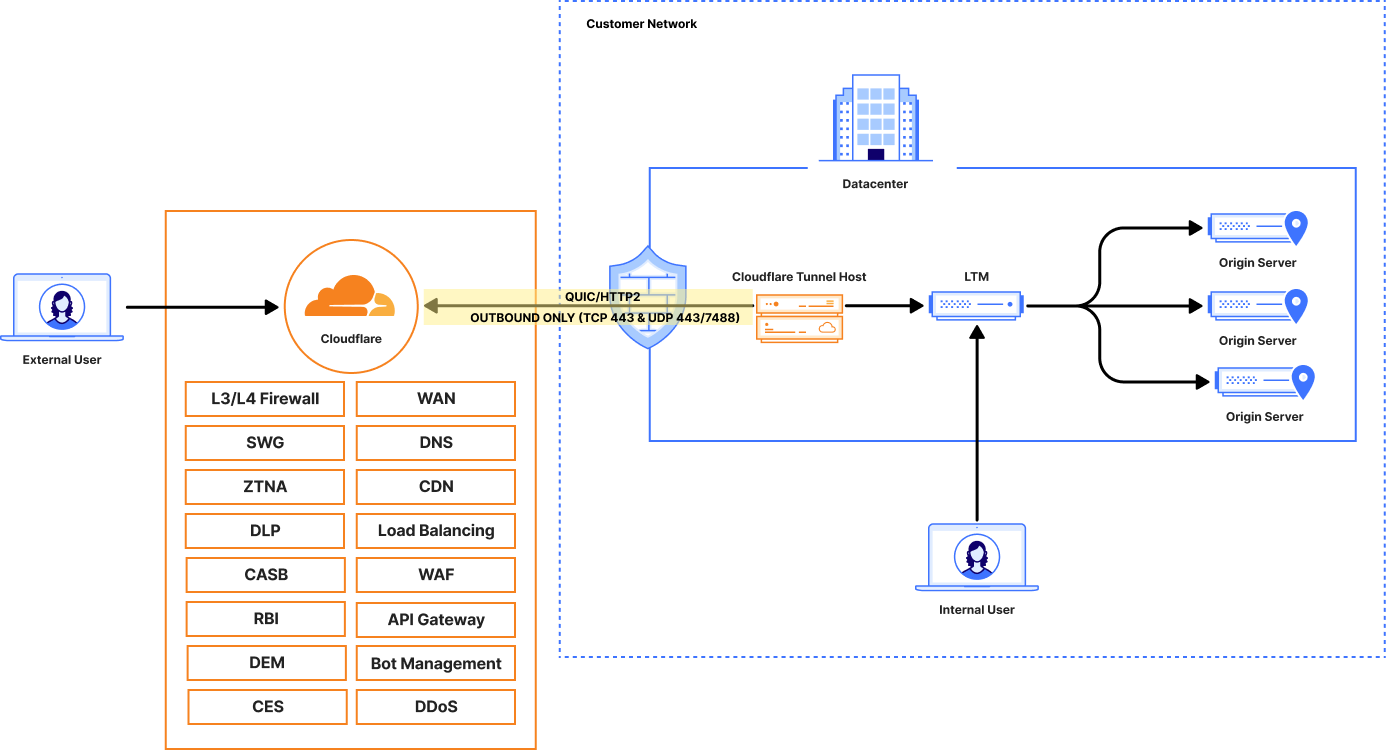
Scenario 1: GTM Replacement with Public Load Balancing & Cloudflare Tunnel
This scenario is ideal for organizations seeking to replace GTM functionality for specific public-facing applications hosted on-premise without exposing origin servers directly to the internet.
Objective: Replace GTM with Cloudflare's global load balancer, using a secure, outbound-only connection to reach internal resources.
Core Components:
- Cloudflare Public Load Balancing: Acts as the GTM replacement, steering traffic across globally distributed origins based on health, geography, or latency.
- Cloudflare Tunnel: Creates a secure, encrypted tunnel from the on-premise environment to the Cloudflare network. This eliminates the need for public IP addresses on origins and the risk of opening inbound firewall ports.
Architecture
- A user requests app.acme.com.
- Cloudflare DNS resolves the request to a Cloudflare Load Balancer.
- The Load Balancer selects the optimal origin pool based on configured policies.
- Traffic is routed through the Cloudflare network to the secure Tunnel endpoint corresponding to that origin.
- The cloudflared daemon receives the traffic inside the private network and forwards it to the final destination (e.g., a web server at 10.0.1.10).
High-Level Implementation Steps
- Install cloudflared: On a server within the data center that can reach the application servers, install the cloudflared daemon. This server will initiate the secure outbound connection to Cloudflare.
- Create and Configure the Tunnel:
- Authenticate cloudflared with the organization's Cloudflare account.
- Create a persistent Tunnel. This action registers the Tunnel with the Cloudflare network and generates a unique UUID.
- In the Tunnel's configuration within the dashboard define either of the two options:
- The services to be exposed. This is done by mapping a public hostname to the internal service URL (e.g., hostname: app.acme.com, service: http://10.0.1.10:80).
- Define a private address range that the Cloudflare tunnel is able to direct traffic to: 10.0.10.0/24
- Set Up Cloudflare Load Balancer:
- Create Health Monitors: Configure monitors to check the health of internal services through the Tunnel.
- Create Origin Pools: Create one or more pools representing the on-premise services. For the origin address, either of the following configurations are supported:
- Use the public hostname assigned in the Tunnel configuration (e.g., app.acme.com). Cloudflare will automatically route traffic destined for this hostname through the correct Tunnel.
- Use the private IP addresses of the origins reachable behind the Tunnel.
- Create a Load Balancer:
- Define a DNS hostname for the load balancer (e.g., loadbalancer.acme.com).
- Attach the origin pools and configure traffic steering policies (e.g., Geo-steering, Round Robin).
- Create either a public CNAME record in Cloudflare DNS (e.g., app01.acme.com) that points to the load balancer's hostname (loadbalancer.acme.com) or create the load balancer with the desired hostname. If an existing hostname already exists, as long as the load balancer is enabled the load balanced record will take priority over any existing DNS records.
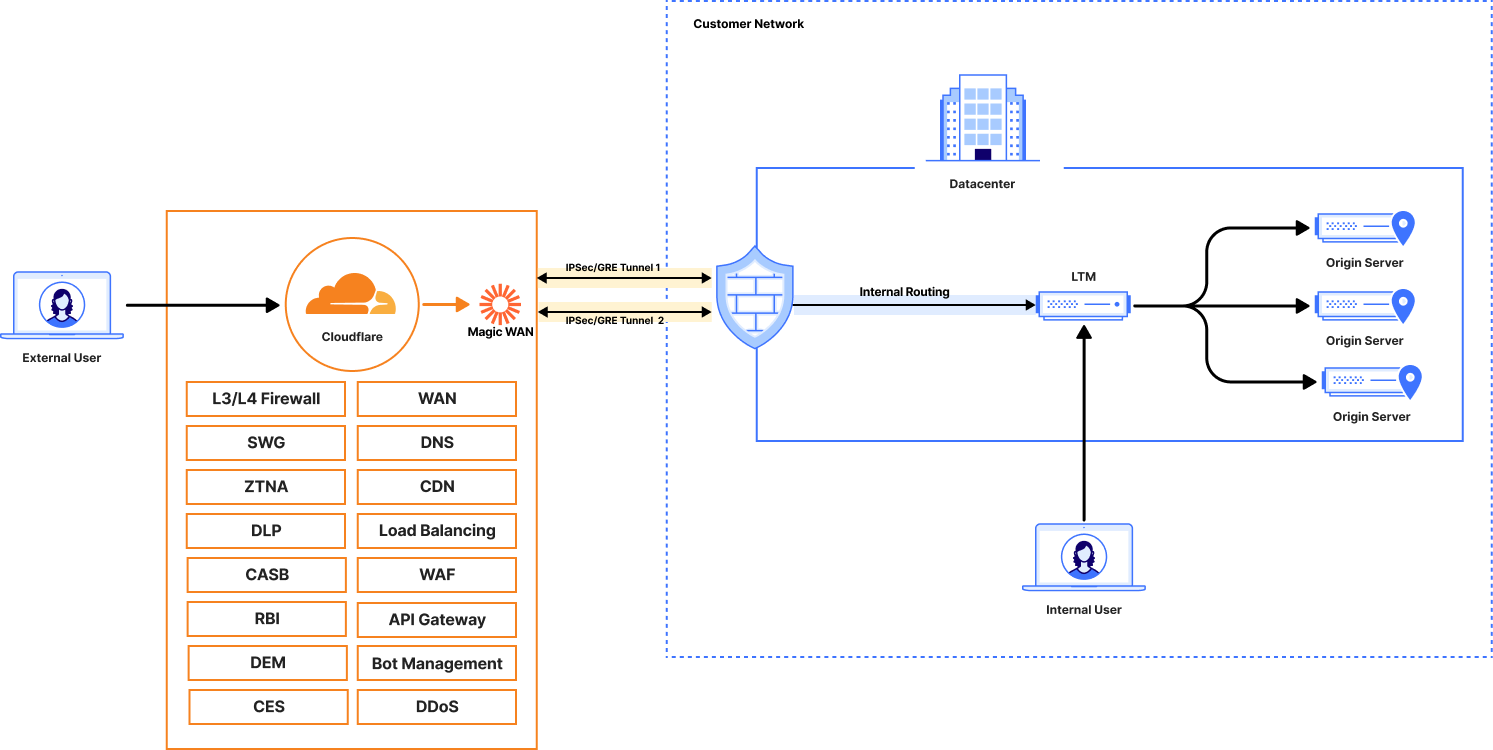
Scenario 2: GTM Replacement with Public Load Balancing & Magic WAN
This approach is suited for organizations that require network-level connectivity between their on-premise data centers and Cloudflare, creating a unified network fabric.
Objective: Replace GTM functionality by allowing Cloudflare Load Balancing to route traffic directly to private IP addresses over a secure network interconnect.
Core Components:
- Cloudflare Public Load Balancing: Serves as the GTM replacement.
- Magic WAN: Connects the entire on-premise network to Cloudflare's global network using standard GRE or IPsec tunnels. This provides a secure and high-performance on-ramp for all traffic.
Architecture
- A user requests app.acme.com
- Cloudflare DNS resolves the request to a Cloudflare Load Balancer.
- The Load Balancer selects the healthiest origin pool and routes traffic to the private IP address of an origin server.
- Cloudflare's network routes the traffic over the Magic WAN tunnel directly to the on-premise network edge router.
- The router forwards the packet to the internal application server at its private IP.
High-Level Implementation Steps
- Onboard the Network with Magic WAN:
- In the Cloudflare dashboard, define the private IP address ranges.
- Establish one or more GRE or IPsec tunnels from the network edge routers to the Cloudflare network.
- Use a routing protocol (like BGP) or static routes to advertise the private subnets to Cloudflare.
- Set Up Cloudflare Load Balancer:
- Create Health Monitors: Configure monitors that will check the health of origins by sending probes over Magic WAN to their private IP addresses.
- Create Origin Pools: Create pools and add the origin servers using their private IP addresses (e.g., 10.0.1.10, 10.0.2.20). Because the network is connected via Magic WAN, Cloudflare's network can route to these IPs.
- Create a Load Balancer: Configure the load balancer and associated DNS records as described in Scenario 1. The key difference is that the origins are now private IPs, not hostnames managed by a Tunnel.
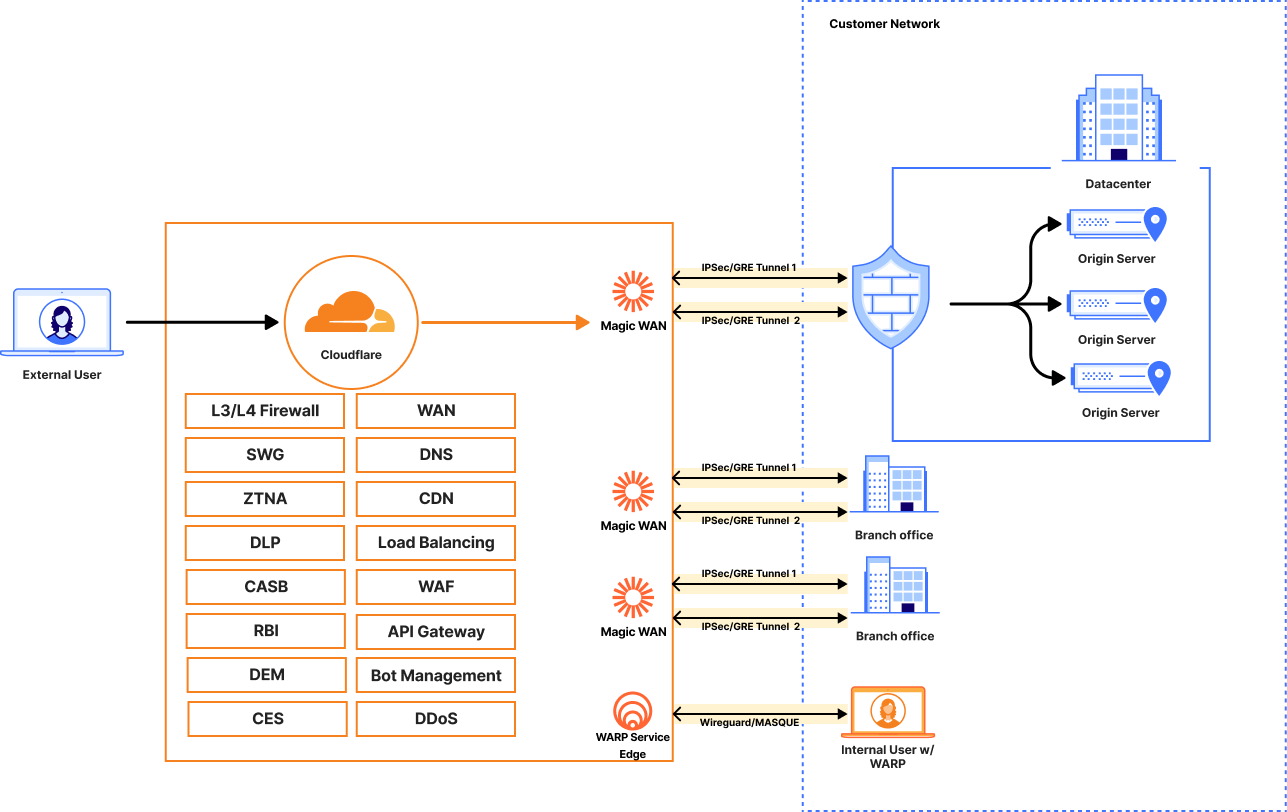
Scenario 3: GTM & LTM Replacement with Magic WAN & WARP
This is the most comprehensive scenario, creating a full Zero Trust architecture that replaces both external (GTM) and internal (LTM) traffic management with a single, unified platform.
Objective: Manage both public-to-private and private-to-private traffic flows using Cloudflare, eliminating the need for on-premise GTM and LTM appliances entirely.
Core Components:
- Cloudflare Public Load Balancing: Replaces GTM for internet-facing applications.
- Cloudflare Private Load Balancing: Replaces LTM for internal applications, accessible only to authenticated users.
- Magic WAN: Connects data centers to the Cloudflare network.
- Cloudflare WARP: A client deployed on employee devices that securely connects them to the Cloudflare network, enabling Zero Trust Network Access (ZTNA).
Architecture
External Flow (GTM Replacement):
- Internet User → Public DNS → Cloudflare Public LB → Magic WAN → On-Premise Origin
Internal Flow (LTM Replacement):
- Employee Device with WARP → Cloudflare Private LB → Magic WAN → On-Premise Origin
- Employee Device with/out WARP at a location connected via Magic WAN → Cloudflare Private LB → Magic WAN → On-Premise Origin
High-Level Implementation Steps
- Deploy Network and User Connectors:
- Deploy Magic WAN to connect the data centers as described in Scenario 2.
- Deploy Magic WAN to connect additional remote office locations.
- Deploy the Cloudflare WARP client to employee devices to ensure their traffic is routed through Cloudflare for Private Load Balancing.
- Configure Public Traffic Management (GTM Replacement):
- Follow the steps in Scenario 2 to create a Public Load Balancer that directs internet traffic to the private IPs of the public-facing applications.
- Configure Private Traffic Management (LTM Replacement):
- Create Private Origin Pools: In the Load Balancing section, create pools containing the private IP addresses of internal-only applications.
- Create a Private Load Balancer:
- Create a new Private Load Balancer at the account level and in its configuration, ensure assign it either a Private Cloudflare IP or a private IP address from a designated range.
- Attach the private origin pools and configure health checks.
- (Optional) If you want your load balancer and its endpoints to be transparently accessible to users via a hostname, you can create a DNS record in your internal DNS system or create an override in Cloudflare that maps the hostname to the Load Balancer's IP address. This ensures that traffic destined for the hostname resolves to the correct IP.
This final configuration provides a unified solution for managing application access for all users, regardless of location, while completely removing the dependency on legacy on-premise hardware.
Related posts


Leave a Comment
Your comment will be reviewed before appearing on the site.
Comments
Be the first to comment on this post!